संवेदनशील डेटा या बहुत अधिक मेमोरी खपत: गिट इतिहास को बदलने के लिए अच्छे कारण हैं। इस ब्लॉग पोस्ट में, मैंने बताया कि BFG का उपयोग करके Git इतिहास से फ़ाइलों को कैसे शुद्ध किया जाए। BFG का एक कमजोर बिंदु प्रत्यक्ष पथों के लिए समर्थन की कमी है, इसलिए आप इतिहास से विशेष रूप से सबफ़ोल्डर में फ़ाइलों या फ़ोल्डरों को नहीं हटा सकते हैं। इसके साथ, वैकल्पिक समाधानों को देखने का समय आ गया है।
आधिकारिक तौर पर अनुशंसित git filter branch के अलावा , git-filter-repo इतिहास को साफ करने के लिए एक उपकरण है। एक छोटी स्थापना के बाद, हम पहले भंडार का विश्लेषण करते हैं और उदाहरण के लिए, इतिहास के सबसे बड़े फ़ोल्डरों को ढूंढते हैं:
git filter-repo --analyzeठीक है फ़ोल्डर में रहो .git/filter-repo/analysis सभी प्रकार की TXT फाइलें उत्पन्न की:
directories-all-sizes.txtextensions-all-sizes.txtpath-all-sizes.txt- ...
यह फ़ाइल के लायक है directories-all-sizes.txt करीब से देखो:
=== All directories by reverse size ===


Format: unpacked size, packed size, date deleted, directory name


  4624417043 3796607988 <present>  <toplevel>

  4475940396 3778033787 <present>  wp-content

  4060236681 3694449320 <present>  wp-content/uploads

   305163809   70576241 <present>  wp-content/plugins

   123818107   15442735 <present>  wp-includes

...
अक्सर ऐसा होता है कि आपने लंबे समय तक इतिहास में HEAD डेटा को अनदेखा और हटा दिया है (उदाहरण के लिए, वर्डप्रेस मीडिया फ़ोल्डर wp-content/uploads/ या गलती से धक्का दे दिया node_modules- या vendor-जिल्दसाज़)।
आम तौर पर सिफारिश करता है git-filter-repo सफाई के बाद, एक नए, खाली भंडार में धकेलना। यहां सूचीबद्ध कई कारण हैं, यह क्यों समझ में आता है और कई समस्याओं से बचा जाता है। फिर भी, ऐसा हो सकता है कि आप उसी भंडार को आगे बढ़ाना चाहते हैं और यह कुछ संकेतों के साथ भी संभव है।
महत्वपूर्ण रूप से, प्रमुख कोड होस्टिंग प्लेटफॉर्म GitHub तथा गिटलैब विभिन्न दृष्टिकोणों की सिफारिश करते हैं, जिनमें से कुछ एक दूसरे से भिन्न होते हैं। उदाहरण के लिए, GitHub पर हम हटाते हैं wp-content/uploads/ निम्नलिखित चरणों का उपयोग करना git-filter-repo इतिहास से:
mkdir tmp-repo
cd tmp-repo
git clone git@github.com:foo/bar.git .
cp .git/config /tmp/config-backup
git filter-repo --invert-paths --path wp-content/uploads/
# option 1: same repo
mv /tmp/config-backup .git/config
git push origin --force --all
# option 2: new repo
git remote add origin git@github.com:foo/bar-new.git
git push origin --force --all
cd ..
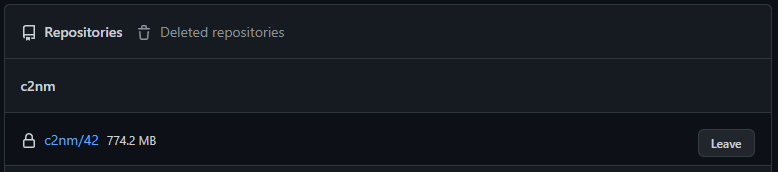
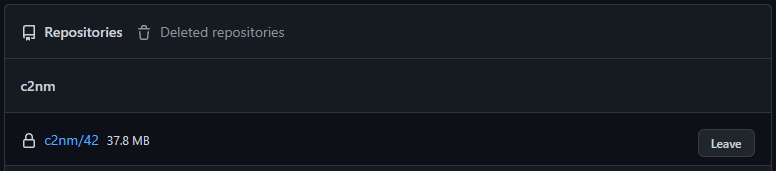
rm -rf tmp-repoअब हम दूर से भी आकार की जांच कर सकते हैं (एपीआई के माध्यम से आकार बदलना और यूआई में 24 घंटे तक लग सकते हैं)। ऐसा करने के लिए, रिपॉजिटरी सेटिंग्स खोलें (यदि रिपोजिटरी किसी संगठन से संबंधित है, तो आपको पहले संगठन में अपना खाता जोड़ना होगा)। अब हम आकार देखते हैं:
GitLab पर प्रक्रिया थोड़ी अलग है:
mkdir tmp-repo
cd tmp-repo
# option 1: same repo
  # Settings > General > Advanced > Export project > download tar.gz file into tmp-repo
  tar xzf 20*.tar.gz
  git clone --bare --mirror project.bundle
  cd project.git
  git filter-repo --invert-paths --path wp-content/uploads/
  cp ./filter-repo/commit-map /tmp/commit-map-1
  # copying the commit-map has to be done after every single command from git filter-repo
  # you need the commit-map files later
  git remote remove origin
  git remote add origin git@gitlab.com:foo/bar.git
  # Settings > Repository > Protected branches/Protected branches >
  # enable "Allowed to force push to main/master"
  git push origin --force 'refs/heads/*'
  git push origin --force 'refs/tags/*'
  git push origin --force 'refs/replace/*'
  # Settings > Repository > Protected branches/Protected branches >
  # disable "Allowed to force push to main/master"
  date
  # wait 30 minutes (😱)
  date
  # Settings > Repository > upload /tmp/commit-map-X
# option 2: new repo
  git clone git@gitlab.com:foo/bar.git .
  git filter-repo --invert-paths --path wp-content/uploads/
  git remote add origin git@gitlab.com:foo/bar-new.git
  # Settings > Repository > Protected branches/Protected branches >
  # enable "Allowed to force push to main/master"
  git push origin --force --all
  # Settings > Repository > Protected branches/Protected branches >
  # disable "Allowed to force push to main/master"
cd ..
rm -rf tmp-repo
~ 5 मिनट के एक और इंतजार के बाद हम नीचे जा सकते हैं Settings > Usage Quotas भंडारण स्थान देखें:


हटाने के बाद, यह महत्वपूर्ण है कि शामिल सभी डेवलपर्स अंतिम चरणों में शामिल हों: यदि कोई उपयोगकर्ता अब अपनी स्थानीय प्रतिलिपि के साथ सामान्य पुश करता है, तो इसके परिणामस्वरूप बड़ी फाइलें केंद्रीय भंडार में वापस चली जाएंगी। इसलिए, निम्नलिखित 3 विकल्पों की सिफारिश की जाती है:
- "गरीब आदमी का ताजा क्लोन"
rm -rf .git && git clone xxx temp && mv temp/.git ./.git && rm -rf temp- परिवर्तित फ़ाइलों के लिए (आवेदन के आधार पर):
git checkout -- .या।git add -A . && git commit -m "Push obscure file changes." && git push
- "सहूलियत बिना शुरू करना"
rm -rf repo && git clone xxx .
- "बदसूरत पुल के साथ rebase"
git pull -r- यहां आपके पास अभी भी अशुद्ध इतिहास है, लेकिन ज्यादातर मामलों में अब आप गलती से बड़े स्थानीय संस्करण के साथ रिमोट रिपोजिटरी को अधिलेखित नहीं करते हैं
वर्तमान कोटा के दौरान (विशेषकर GitLab के नए प्रतिबंधों के कारण ), यह हमेशा आपके रिपॉजिटरी के इतिहास के आकार की जाँच करने और यदि आवश्यक हो तो उन्हें साफ करने के लायक है।:
| गिटहब फ्री | गिटलैब फ्री | |
| अधिकतम फ़ाइल आकार सीमा | 100 एमबी | ∞ |
| अधिकतम रेपो आकार सीमा | 5,000एमबी | ∞ |
| अधिकतम रेपो गणना सीमा | ∞ | ∞ |
| अधिकतम समग्र आकार सीमा | ∞ | 5,000एमबी |
अंत में, यह स्वयं-होस्ट किए गए, निःशुल्क संस्करण जैसे . पर एक नज़र डालने लायक भी है गीता फेंकना। थोड़े से प्रयास से आप a . पर कर सकते हैं बहुत पतला सर्वर एक स्व-होस्टेड गिट इंस्टेंस (जीयूआई प्रति एसएसएल सुरक्षित, बैकअप शामिल, नियंत्रण पर शक्तिशाली एपीआई) मेजबान, जो उत्कृष्ट भी हैं कॉन्फ़िगर और डेटा सुरक्षा के मामले में भी बेहतर है। यहाँ, वैसे, आप भी उपयोग कर सकते हैं git-filter-repo बस भंडारों को सुव्यवस्थित करें:
mkdir tmp-repo
cd tmp-repo
git clone git@git.tld.com:foo/bar.git .
cp .git/config /tmp/config-backup
git filter-repo --invert-paths --path wp-content/uploads/
# option 1: same repo
  mv /tmp/config-backup .git/config
  git push origin --mirror
  # login on the remote command line and run in the repo-folder
  sudo -u git git reflog expire --expire=now --all
  sudo -u git git gc --aggressive --prune=now
  # if you face memory limit issues, modify the git configuration
  sudo -u git git config --global pack.windowMemory "100m"
  sudo -u git git config --global pack.packSizeLimit "100m"
  sudo -u git git config --global pack.threads "1"
  # if in web ui the size does not change, make a slight
  # modification to a file and push again normally
# option 2: new repo
  git remote add origin git@git.tld.com:foo/bar-new.git
  git push origin --force --all
cd ..
rm -rf tmp-repo
यहाँ विशेष रूप से आदेश है sudo -u git git gc --aggressive --prune=now महत्वपूर्ण (क्रोन चल रहा है git gc अन्यथा एक बहुत लंबा है छँटाई का समय 2 सप्ताह)।